I wanted to do a makeup look that would appropriate for an older model in my Mac collage to show that Mac makeup is suitable for all ages. I have done makeup on slightly older clients before; however I wanted to do some research to find out some new tips and tricks to make it look as youthful and flattering as possible. I found a YouTube video by Lisa Eldridge called Glowing, Youthful Day Makeup Tutorial for Mature Skin and I learned many new tips from it.
ELDRIDGE, L., 2013. Glowing, Youthful Day MakeUp Tutorial For Mature Skin [viewed 28th March 2016].
Available from: https://www.youtube.com/watch?v=f-SZA1tkViU
Lisa Eldridge says how important it is to really work the product into the skin to make sure it covers every inch of the skin. If you use a thick layer of foundation then it is more likely to sit in the creases of the skin which would emphasise them; therefore it is important to use a thin and even layer all over the face and neck. Use a light and moisturising concealer, Eldridge suggests using Maybelline Wake Me Up concealer as it's light weight but medium coverage. You only need to use a very small amount and only apply it where there is darkness. Use a cream blush to give her face a dewy finish, adding youthful to her look. Lisa Eldridge used the Fluid Corrective Foundation by Vichy Dermablend to cover the model's cut on her face and any moles and the imperfections disappeared very quickly! This made me very intrigued by this product as it is perfect to cover acne or any other imperfections quickly. I found the product was sold at Boots for £18 so I am very tempted! She said how she felt when you're older you need more defining makeup around the eyes than when you're younger for a more flattering and youthful look. However she suggested doing this in a subtle way by smudging a bit of eyeliner into the upper lash line to make her lashes look thicker and to define the eyes. Lisa said she wouldn't recommend using metallics on more mature eye lids, so I may just stick with the bronzy coloured theme of my Mac collage instead of using unflattering metallics. Stay away from any harsh lines or taking the eye shadow down too far at the corners of the eye as it makes the eyes look droopy. She says to give the model a natural but defined eye brow so the eye brows don't look too heavy as that would drag them down. Keep the lips looking softly defined by using a lip liner but blending it as you go and give the model a natural colour.
 |
| BOOTS, 2016. Vichy Dermablend Corrective Foundation with SPF35 [viewed 28th March 2016]. Available from: http://www.boots.com/en/Vichy-Dermablend- Corrective-Foundation-with-SPF35-30ml_1481875/ |
 |
| SS16 TopShop Unique Girls MARCH, B., 2015. Spring/Summer 2016 hair and makeup trends [viewed 1st February 2016]. Available from: http://www.cosmopolitan.co.uk/beauty-hair/beauty-trends/g4142/spring-summer-2016-hair-makeup-trends/?slide=32 |
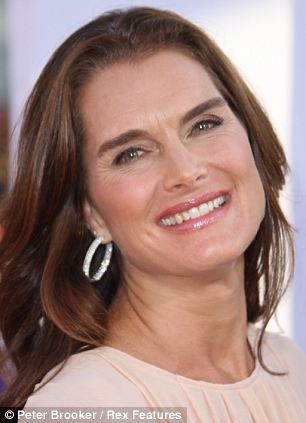 |
| CISOTTI, C., 2012. Bare-faced Beauties: As 47-year-old Brooke Shields steps out make-up free we reveal what other stars really look like au naturel [viewed 28th March 2016]. Available from: http://www.dailymail.co.uk/femail/article-2214584/As-47-year-old-Brooke-Shields-steps-make-free-reveal-stars-really-look-like-au-naturel.html |
The image above is of 47 year old Brooke Shields at a red carpet event. I like that she has given her eyes definition, but without making them look too harsh or dark, giving her a naturally beautiful look. It looks like she has used a medium brown in the crease of the eye and then a darker brown smudged along the top lash line and along the outer edges of the lower lash line to give the eyes definition. The skin look very youthful as it look dewy and healthy with the rose blush. I definitely want to give my model dewy skin as it is a popular 2016 spring/summer trend and it is very youthful. I really like that the lips are a natural 'your lips but better' colour but that they are glossy because I think it look youthful and makes the lips look plump and luscious. Brook Shields has very full eye brows, just like my model, however it could be argued that her eye brows have been filled in slightly too heavily and therefore way the eyes down. When filling in my model's eye brows I will be cautious about not over filling them in.
Face Chart 1

Face Chart 2

Testing Face Chart 2 Makeup
 |
| Before Makeup Application |


This is how the makeup came out the first time I did it and I wasn't completely happy with it. I plucked my model's eye brows slightly to give her a slightly cleaner looking brow; however my model wanted to keep her eye brows slightly messy looking. I like how I lightly filled them in as they look very natural, but more even. I mixed an illuminator in with the foundation to give a dewy finish and I really like how it has given her a healthy looking glow. I applied some Bourjois Bronzing Mousse to the cheek bones and around the forehead; I made sure it looked as natural as possible but added some colour. I added some Accessorise cream blush in Rose to the cheeks with my fingers to give her a flushed look and I really like how natural the colour looks and how easily it melted into the skin; however I don't like how the sides of her nose also look pink as it almost creates leading lines towards her pink toned nose. I don't like how much redness is still visible in the face because I think it makes the blush look messy. I will therefore make sure to conceal the redness on either sides of the nose and on the nose. I added a concealer that was slightly lighter than the foundation under the eyes to brighten that area; however it went a grey colour because the under eyes were so dark. I will add a corrective concealer first next time to cancel out the blue under tones under her eyes. I don't particularly like the lip colour as I think it's too pink and I think a more neutral shade would be more flattering. I applied a rich gold on the eye lids and blended it into the crease, I then applied some dark brown eye shadow along the top and bottom lash line to give the eyes some definition and to make the lashes look thicker. I like how the eyes turned out, however I think it would be more flattering to have a brighter colour on the eye lids because I want to make her eyes look very bright and youthful. I am happy that I only put mascara on the top lashes because I think if I made the lower lash line look any darker it would weight the eyes down and made them look more droopy; however I need to curl her upper lashes slightly more to open the eyes up more.
Testing Makeup 2 (Final Look)
Equipment:
-Johnson's Makeup Be Gone Wipes
-Clean & Clear Dual Action Moisturiser
-Urban Decay Primer Potion
-Laura Mercier Translucent Powder
-Real Techniques Setting Brush
-theBalm Nude'tude Palette in Sassy, Selfish, Sophisticated
-Mac 217 Brush
-Silk Pro Eye Detailer Brush
-Eye lash curlers
-Maybelline The Colossal Go Extreme Waterproof Mascara
-Tweezers
-Rimmel Professional Eyebrow Pencil in Hazel
-L'Oreal True Match Foundation colours W.3 and W.1
-Nars Illuminator in Copacabana
-Real Techniques Contour Brush
-CoverGirl&Olay Simply Ageless Concealer in 210
-NYX Dark Circle Concealer Correcteur in Light
-Bare Minerals Concealer in Well-Rested
-Bourjois Bronzing Primer
-Style Master Fluffy Concealer Brush
-Accessorise Cream Blush in Rose
-Rimmel Lasting Finish Lip Liner in Tiramisu
-Rimmel Kate Moss Lipstick in 03
-Silk Pro Eye Detailer Brush
-Rimmel Oh My Glosh! Lip Gloss in Glossaholic
Step by step:
1. I first cleansed the face with the Johnson's Makeup Be Gone Wipes to remove any makeup or excess dirt on the face.
2. I next moisturised her face with the Clean & Clear Dual Action Moisturiser.
3. I first applied the Urban Decay Primer Potion all over her eye lids so that the eye shadow wouldn't crease. I gently blended this out with my finger.
4. I lightly dusted some Laura Mercier Translucent Powder all over the eye lids with the Real Techniques Setting Brush to set the primer so the eye shadows on top would blend more easily.
5. I applied the colour Sassy from the theBalm's Nude'tude Palette all over the lid and into the inner corner with the Mac 217 Brush to brighten the eyes. I blended this out into the crease.
6. I next lightly applied the colour Selfish from the same the theBalm Palette on the outer half of the lid to add a bit of dimension. I did this with the Mac 217 Brush.
7. I next took the colour Sophisticated from the same the theBalm Palette on the Silk Pro Eye Detailer Brush and lightly smudged that all along the upper lash line and on the outer half of the lower lash line. I didn't want this to look harsh so only used a light hand and I made sure I didn't drag the eye shadow too far down on the lower lash line as I wanted it to look subtle.
8. I curled the top lash line with some eye lash curlers.
9. I applied a light coat of Maybelline The Colossal Go Extreme Waterproof Mascara on the top and bottom eye lashes.
10. After asking the model for permission I plucked any hair in the eye brows I felt were too out of place; however I still wanted to keep the bushy look as I think it's youthful.
11. I filled in any sparse areas in the eye brows with the Rimmel Professional Eyebrow Pencil in Hazel and then brushed them out with a disposable mascara wand to remove any excess product and to push all the brow hairs in the right direction.
12. I mixed L'Oreal True Match Foundation colours W.3 and W.1 to match the model's skin colour and then added Nars Illuminator in Copacabana to add the dewy finish.
13. I applied this lightly all over the face with the Real Techniques Contour Brush, making sure to take it down the neck and onto the ears.
14. I took some CoverGirl&Olay Simply Ageless Concealer in 210 and applied it to the sides of the nose, down the centre of the nose and on the chin to cover any redness and to highlight slightly.
15. I took the NYX Dark Circle Concealer Correcteur in Light and lightly dabbed in on the dark areas under her eyes to cancel out the darkness.
16. I followed this with the same foundation mixture, applying it very lightly under the eyes, not disturbing any of the eye makeup.
17. I set the under eyes the Bare Minerals Concealer in Well-Rested to stop the product from creasing.
18. I used the Laura Mercier Translucent Setting Powder and the Real Techniques Setting Brush and applied some powder either sides of the nose and on the chin to get rid of any excess shine.
19. I applied a very light amount of Bourjois Bronzing Primer around the hair line, under the cheek bones and either sides of the nose to add some warmth to the skin and to contour the face slightly. I used the Style Master Fluffy Concealer Brush to do this.
20. I dabbed some Accessorise Cream Blush in Rose to the apples of the cheeks and blended it slightly backwards with my fingers to give a natural flush.
21. I lined the model's lips with the Rimmel Lasting Finish Lip Liner in Tiramisu to add definition.
22. I applied the Rimmel Kate Moss Lipstick in 03 all over the lips with Silk Pro Eye Detailer Brush.
23. I finally applied some Rimmel Oh My Glosh! Lip Gloss in Glossaholic.


I much prefer this makeup look to my previous practice. I still mixed the foundation with an illuminator to give a beautiful, healthy glow to the skin as I loved how it looked in my previous makeup test. I decided to apply the eye makeup before applying the concealer as I found that when I applied the eye shadow around the eyes it fell and made the conceal look more grey under the eyes. I also decided to use the same foundation under the eyes as I had used over the face as it was a lighter consistency so it wouldn't look as caky, and it will match the colour of the rest of her face seamlessly. I used a slightly orange concealer under her eyes to the darkest parts of her under eyes to cancel out the blue before applying a thin layer of the foundation on top. I applied some concealer either side of the nose and down the centre of the nose because I felt these areas were too red in my last makeup test so I wanted to cover these areas. I set the under eyes with a loose translucent powder to set the makeup and also either side of the nose and on the chin to get rid of any excess shine. I really like how I have cancelled out the redness in her face because it makes her look a lot brighter and fresh and it makes the pink blush stand out in a more flattering way. I kept the eye brows looking natural and full, just filling in any sparse areas. I applied a light white/gold colour to the eye lids and blended it out softly to brighten the eyes. I applied a small amount of a light shimmery grey onto the outer half of the upper eye lid to give the eyes some definition. I applied a slightly more grey toned brown along the top lash line and on the outer half of the lower lash line as I felt the brown I used before was too red toned and brought out the redness in her eyes slightly which I didn't think was very flattering. I curled the top eye lashes more and I really like how pretty the feathery eye lashes look as they really open up the eyes, making them look more doll-like and youthful. I gave the lips a stronger outline as I felt the lips before looked slightly blotchy and uneven. I also gave them a more nude/peachy look as I thought it was more natural because it didn't bring out any redness in her face. I finish off the lips with a gloss to make the lips look more plump and luscious.
My Final Image

I am so happy with how this image came out because I think my mature model looks youthful and fresh. I love how dewy the face and chest look because it gives her a healthy glow and makes her skin look plump and hydrated, and therefore more youthful. I also like that the dewy skin continues down the neck and onto the chest because it stops the makeup from looking like a mask on the face. I mixed the foundation I used on the face with some Johnson's Baby Oil to achieve the beautiful glow on her check and neck. I like that I only used minimal product on the skin because it looks flawless, but still light and natural. I like that I used a cream blush on her cheeks because they look naturally flushed, dewy and it blends so seamlessly into the skin. In my first practice I think I made the eyes look too dark which I felt made her eyes look smaller and more tired so I like that I made the eyes look very bright with the white shimmery eye shadow, but that I still added definition with a grey toned eye shadow around the lash line. I am really happy with the lip colour because it looks natural, but reflects the peachy tone in the cheeks which I think ties the look together beautifully. I love the glossy sheen on the lips because it continues the youthful glow and makes them look plumped up and luscious, which is a look Mac are very fond of.
References:
ELDRIDGE, L., 2013. Glowing, Youthful Day Makeup Tutorial for Mature Skin [viewed 26th March 2016]. Available from: https://www.youtube.com/watch?v=f-SZA1tkViU
No comments:
Post a Comment