-tail comb
-brush
-hair elastic
-hair grips
-hair pins
-hair spray
-hair accessories
Step by step:
1. Create a side parting and then section off the front two sections, taking a line from the back of the ear to the back of the ear.
2. Brush the back section back, comb all the hair into a low ponytail and secure it with a hand elastic tightly.
3. Back comb the top of the ponytail hair gently and then curl the hair over towards the head to create almost a tunnel shape.
4. Secure the 'tunnel' at the top of the curl, with one on either side.
5. Start pulling the hair outwards from the middle until the chignon is closed up completely.
6. Use the pins like chop sticks and take the pin along the hair going outwards and then turn it under itself and go towards the middle.
7. Twist the front two sections and take them back so that the twisted hair going on top of the chignon.
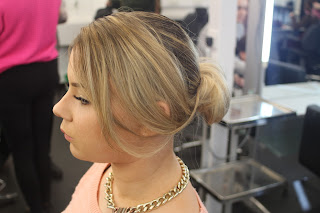
Below is a photo of the hair look with out any accessories.
I love how neat the hair look it because I think it would be perfect for wedding hair or 'going out' hair. I found this hair style very quick and easy to do; however I still think it looks like a lot of effort and time was put into it. I really like how the hair looks when it is twisted back into the chignon because the colours in her hair really make it stand out. I like how I backcombed the hair slightly before I put it into a chignon because it gave it more body and fullness; however I think I could have taken longer when creating the shape of the chignon because it isn't completely symmetrical, although it is pretty close! I like how the twisted hair wraps over the chignon because it adds a pretty and feminine detail. The front of the hair style looks very slick which could work well for an older lady or for an event where the hair needs to be very neat; however I don't think it suits my model and I think a messier look would work better, to give her more volume.
I love how neat the hair look it because I think it would be perfect for wedding hair or 'going out' hair. I found this hair style very quick and easy to do; however I still think it looks like a lot of effort and time was put into it. I really like how the hair looks when it is twisted back into the chignon because the colours in her hair really make it stand out. I like how I backcombed the hair slightly before I put it into a chignon because it gave it more body and fullness; however I think I could have taken longer when creating the shape of the chignon because it isn't completely symmetrical, although it is pretty close! I like how the twisted hair wraps over the chignon because it adds a pretty and feminine detail. The front of the hair style looks very slick which could work well for an older lady or for an event where the hair needs to be very neat; however I don't think it suits my model and I think a messier look would work better, to give her more volume.
8. I then added some jewels to make it look more catwalk or more suitable to go out in the evening.
I like how you can make this very simple hair style look a lot more glamorous or dressed up by adding accessories. I added this statement necklace to the top of the chignon by placing it on top and then tucking the ends in with hair pins. I like that this instantly makes the look more suitable for going out to dinner or an event. However if you added a veil or white pearls it would be perfect for a wedding hair look.
I took the hair accessories out and made the look a lot more messy and I really liked how it came out. It looked a lot more modern and suitable for a younger woman to where. I think this hair look would now be suitable for a more relaxed event, as well as a more posh one. I really like how the loose hair round the face framed the face and how elegant, yet trendy it looks falling and swooping to the back at the side of her face. I love how versatile this hair look is and I can definitely see myself using it in the future!


No comments:
Post a Comment